# Deep-dive Business Layer
We will delve a bit more in the business layer configuration in this section. It is time to see how they are developed, some of the limitations, and the things you have to keep in mind while designing relationships.
# Entity Relationships
In a previous chapter we saw the different possible relationships in Salesforce.
As you may have realised by now (or not - depending on your background) Salesforce relationships map back to the database design model. But, they are not the same at many levels – the objects and relationships are abstracted to become more powerful.
While dealing with relationships, get used to parent/child terminologies and where relationships are initiated from. They may be called related objects, master-detail, source / target - does not really matter. The big thing to remember is that you are viewing detail / related records in the context of the parent/source object.
Relationships decide the functionality that can be implemented in parent or child on many levels -
- Data security rules applicable to the related record
- Possible functions like roll-up summary on the parent object, or using a formula field to inherit something from parent
Design relationships for scale and performance -
- Querying on M:M records is no joy
- Designing something as 1:1 only to be changed to 1:M later is a lot of work
- You will not be able to leverage salesforce provided functions by going out of the way with your own design - for e.g. not being able to inherit parent ownership rules for the detail record
# Master-Detail Relationship
You link two objects so that one becomes the master (a.k.a parent) in a master-detail relationship.
For example, there is a master-detail relationship on the 'account' object to 'attachments'.
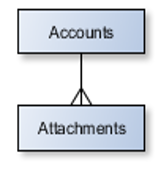
So how about on the 'attachment' side of things? Should it relate back to account? Should it have any particular relationship? Well, the answer is - it really depends. Attachments may or may not independently exist without account. The two relationships may also be independent or not quite independent - they are distinct though.
In Master-Detail relationships -
- Parent controls detail and sub-detail record behaviour
- Deleting master record will delete detail record
- Detail will inherit and follow master’s visibility/sharing rules
When you are designing the detail record layout you will see that the Master field is required on record layout - you cannot quite remove the field from 'edit' layout.
Unique capabilities to master-detail relationships -
- Roll-up summary fields provided out of box. You can sum a field or provide count of records using a formula field on the parent object
- Administrators can enable reparenting function - you can change parent of a child record. This is useful in certain scenarios like when you are trying to transfer contacts to a new account
Limitations -
- Master detail has tougher limits as compared to other relationships - you can have only 2 master-detail relationships in a custom object.
- You cannot make a salesforce standard object as the detail object in the relationship.
- Not a hard limit but a best practice. Not more than 10,000 detail for per master record - in theory, you may have as many as you want
# Lookup Relationships
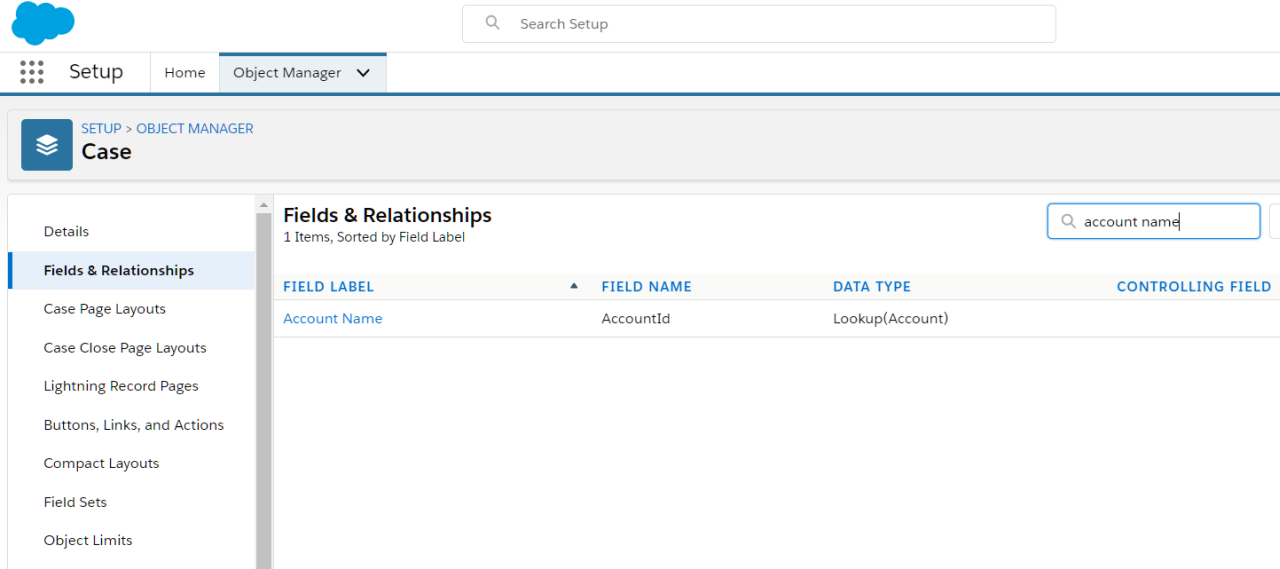
Lookup relationships are similar to master-detail relationships in a lot of ways. There can be 1:M or 1:1 relationship between two objects (or object relating to itself - self relationship) linked through a lookup. The looked up object's reference is stored in the source.
For example, Cases have a lookup relationship with Accounts.
A few interesting points about lookups -
- They don't support roll-up
- Related records are not automatically shared (or 'unshared') based on parent
- Deleting fields in a relationship is more tricky. You can choose how system should treat deletes -
Clear the value of this field: Deleting parent can clear parent from detailDon't allow deletion of the lookup record that's part of a lookup relationship: Do not allow deletion of parent if detail is presentDelete this record also: Delete parent if child is deleted (only for custom objects)Delete this record alsocan result in cascade delete. This has to be turned on by Salesforce (can delete detail records even if users can't see them)
- Detail deletion does not get logged in field history tracking if parent is deleted
# Other Relationships
# M:M using junction object
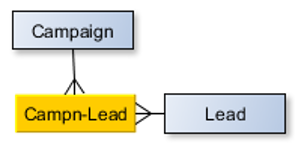
M:M relationships in salesforce are a couple of 1:M relationships between the said objects and a third object called 'junction object'. The junction object is a simple object that typically stores ids of related records from two different objects. This is similar to the intersection table concept in relational databases
For e.g. a campaign can have one or more leads. A lead in-turn can be part of more than one campaign.
# External lookup:
An external object is a Salesforce object representation of data structure that resides outside the org.
For e.g you can relate Salesforce accounts to orders stored in ERP. Then -
- orders are created as external objects within salesforce. It integrates using supported mechanisms to get data from the said external system
- a relationship field is created to relate those external records to account.
External look up fields specify an external object as parent and salesforce object as the child.
# Indirect lookup
Again relates an external object to salesforce objects - only in this case, external object is child and parent is a custom/standard object.
This kind of relationship uses an unique external id as key.
# Self relationship
A self-relationship is an object relating to the same object. It is not exactly a distinct type of relationship - it can be either 1:1 or 1:M.
For e.g. an account can have zero or more child accounts.

# Hierarchical relationship
Hierarchical relationships define cascading relationships between records. In Salesforce it exists only for User object.
# Relationship Quick Reference
Different relationships in Salesforce -
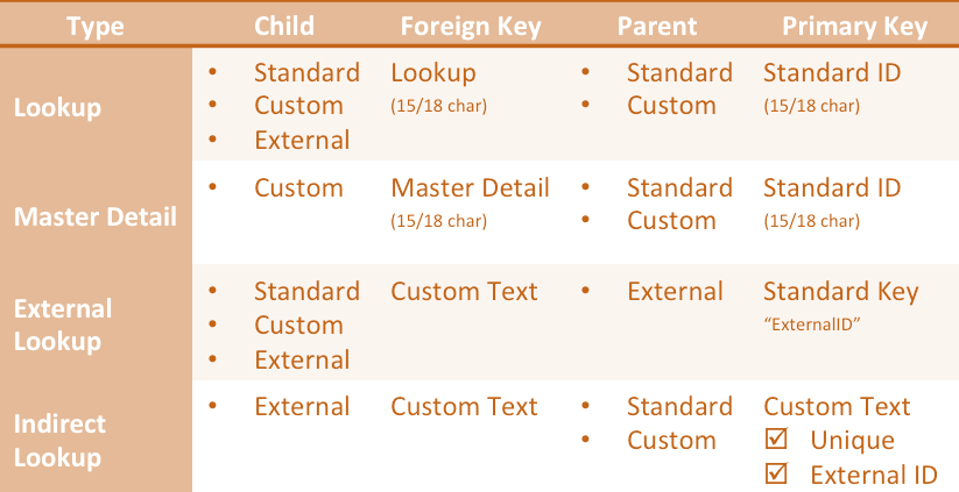
src: salesforce.com
It is also important for you to understand the different possible relationships with 'external' objects.
| External Lookup | Indirect Lookup |
|---|---|
| External object parent -> Custom or standard (or external) object detail | Custom or standard parent -> external object detail |
| Use external id field on parent external object mapped to details’ ext. relationship field | Custom, unique external id in parent maps against child indirect lookup relationship field |
# More on Fields
How many fields does a man need?
-- Totally not Tolstoy
We have seen how fields functions as attributes of an entity. But there are way more enchanting properties to them attributes than meets the common eye.
So.. here we're discussing the deeper philosophy of fields in Salesforce.
# Picklists
You may have noted in the previous chapter that fields can be of type 'picklists'.
Picklists all you to control what users enter against the field. Instead of typing away to glory, a picklist field presents a set of values that user can choose from (or they can start typing in and receive suggestions).
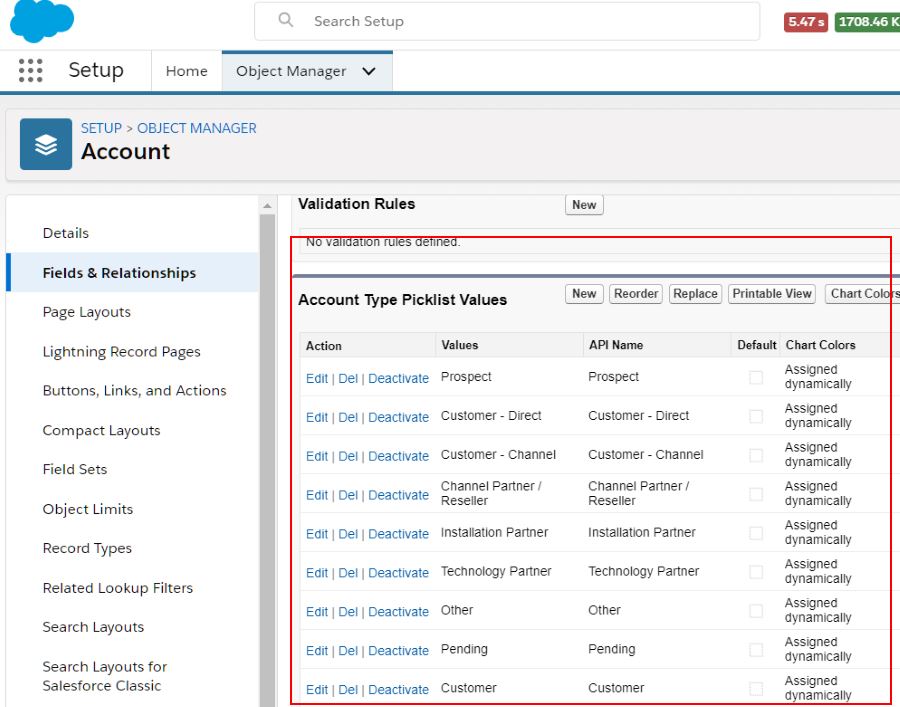
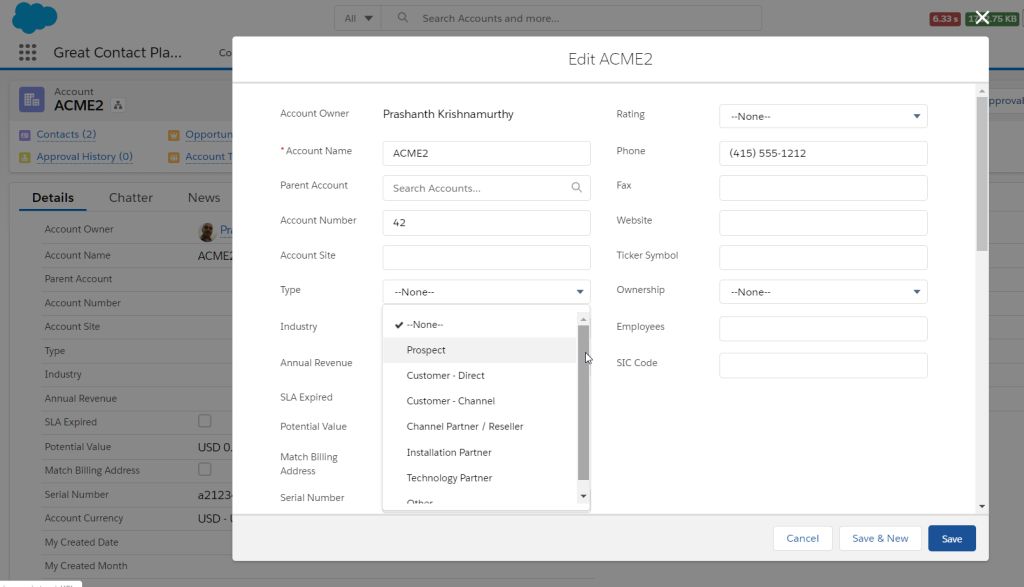
In practice, you create a picklist field against the object and provide the values.
.. and see it in action on the actual screen.
You may also configure a 'multi-select picklist'. As the name suggests, the user can select more than one value against the field.
Picklists can also depend on each other. For e.g. -
- The list of valid 'Account Sub Type' values may depend on which 'Account Type' value is selected
- A 'Case Sub Status' may show only specific values depending on whether 'Case Status' is 'In Progress' or 'Closed'
In dependent picklists -
- The picklist that depends on another picklist field is called 'dependent picklist'
- The picklist (or a 'checkbox' which has finite valid values) on which the first field depends on is called 'controlling picklist'
Note that the dependent and controlling picklist values will be for same record.
There are rules that dependent and controlling picklists play by -
- Controlling picklist can be any one of standard picklist, custom picklist, standard or custom checkbox
- Dependent picklist can be one of custom picklist, multi-select picklist
# Formula Fields
In Salesforce any and every "value" for an attribute has to come from the business layer. i.e., from fields.
Fields are like columns in a table - they store data and do stuff around storing data. But, what if you want values that need to dynamically respond to other values or external factors?
Enter formula fields.
Formula fields are just a type of fields that calculate values at runtime and at the specific instant (well, when fields are being retrieved from backend business layer).
For e.g. formula fields can be used to -
- Color coding an Account depending on annual revenue (if revenue > 1M: show GOLD, if revenue < 1000: show RED )
- Depending on time of the day show
How am I?as 😀 or 😴
Note that we are talking about "actual" fields here, we can use something called "bucket" fields in reports and that's an entire new discussion topic.
Formula fields support calculations using common operators (math/logical) and powerful functions (text, math, date/time, logical and advanced).
To create a formula field -
- Go to Setup > Object Manager tab > Drill down on object of interest
- Go to Fields in left navbar
- Click on New to create a new field
- Select Formula as field type, and hit next
- Select type of formula field. It can be one of Checkbox, Currency, Date, Date/Time, Number, Percent, Text or Time
- Enter your beautiful formula that can include operators, functions and Salesforce fields (current entity and related entities)
Fields used in formula fields are often called "merge fields". Although merge fields can be fields that can be included in mails (when doing "mail merge") or on reports, "merge fields" in formula context are just fields which can be included in the formula.
Include the field in any UI, provide "proper" visibility rules for field, and you are good to go. Formula fields are read-only and are not visible on 'edit' views - you view them, not change them. Just use the Insert Field dropdown in the formula editor to start using merge fields.
The visibility of formula fields is distinct from those of any underlying fields. You can, in fact, better manage sensitive information by a deploying a powerful cocktail (wrong choice of word?) of field-level security rules + formula fields.
You can include comments in your formula. Following is a valid formula..
AND(
/* enforce rule only when you hit revenue limit */
TotalRevenue > 1000000,
/* partner flag must be checked */
Partner_Flag_c = true
)
You can't nest comments though.
Take note -
- Formula fields can only contain 3900 characters including everything in the field (incl. comments, operators, et. al.)
- "Type of field" should represent the actual type. And, these are subject to business layer limitations - for e.g. Number field cannot have more than 18 digits
- You can 'escape' stuff using
\. For e.g.Revenue \+ Taxwill certainly not sum revenue and tax - Any time there is an error - e.g. division by zero, abnormal type, or any other errors, will display the super helpful
#Error!message against the field in runtime - Check
Treat blank fields as zerosorTreat blank fields as blanksas appropriate to manage blanks in odd places
A formula formula in formula field that includes more objects than the current object is called 'cross-object formula'.
- Cross object formula can reference master object if the current object is on detail side of the relationship (well, the name is 'master-detail'. So, not many choices in that relationship. PS: we will stop with dad jokes now)
- Cross object formula can be used in lookup relationships
- You can refer to fields of an object that is 10 relationships away (for e.g. the parent account of the account of the contact in consideration)
- There can be a max of 10 unique relationships used across the fields in a single object at any given time
There are a few more interesting details there too -
- Formula fields convert currencies (bigger topic) to locale currency. However, if you refer to something in custom settings, there is no automatic conversion
- Roll-up summary fields cannot reference cross-object formula fields
And, before we forget - do not miss
- the salesforce.com formula cheat-sheet even if you are a committed anti-cheat enthusiast in real life.
- Tips for reducing formula size
- Advanced sample formulae
# Roll-up Summary Fields
When we discuss formula fields we cannot quite miss 'roll-up summary fields' in the same breath.
Roll-up summary fields can be used on the master object in a master-detail relationship to calculate and display an aggregate (sum, count, minimum, and maximum) of the fields on detail object.
To create a formula field -
- Go to Setup > Object Manager tab > Drill down on object of interest
- Go to Fields in left navbar
- Click on New to create a new field
- Select Roll-up Summary as field type, and hit next
- Fill up further details depending on which type of roll-up summary you select
When including the child object, you may choose to input a filter criteria so that only child records that meet the criteria will be considered to do the roll-up summary.
Similar to their formula field counterparts, roll-up summaries include records / fields in their calculation even if those records/fields are not accessible to user.
Note that the roll-up summary field does not quite do them calculations at the specific instant, but can be considered 'pre-calculated' and stored in a transparent way. It does not quite appear that way since Salesforce manages those calculations dynamically, but those need to be accounted for in some tricky situations.
Once you create a roll-up summary, you cannot convert master-detail relationship used by the field to look-up relationship.
Field types of roll-up summary fields can be -
- Number, currency, and percent fields for SUM roll-up type
- Number, currency, percent, date, and date/time for date/time roll-up type
More interesting tidbits -
- Since you create roll-up summary on master object, it can be created on both custom or standard object as long as they are the master (sigh!). For e.g. accounts may have "Opportunity Revenue" roll up summary as the sum of revenue expected from all opportunities tagged against the account
- You can include other formula fields (not cross-object formula fields) in roll-up summary. If the formula fields result in an error, they are just ignored in roll-up summary value. Formula fields included in roll-up summaries cannot contain super-dynamic values like
TODAYorNOW - Roll up summary fields cannot reference long text area, multi-select picklists, system fields and look-up fields
- Roll-up summaries are not recalculated automatically when child records are deleted. You can force recalculation against a field by selecting Force a mass recalculation of this field in Edit view of master
- Roll-up summary errors can stop calculation that field altogether until you force a recalculation or change values being summarised
- Roll-up summaries may trigger workflows etc. on value change, but there are exceptions
Head over to Salesforce roll-up summary help page to know the possibilities and excitement of using roll-up summary fields.
# Validation Rules
We have been shouting on roof-tops about validation - until now. We now get promoted to 'shouting on mountain-tops' about them rules.
Validation rules do just that - they validate data entered by user. They prevent saving the record until the right data is entered and users comply. You create validation rules against the object.
To create a rule -
- Go to Setup > Object Manager tab > Drill down on object of interest
- Go to Validation Rules in left navbar
- Click on New to create a new rule
- Enter formula and make merry
In the below example, we used a validation rule on a field that is being summed up at account level by custom logic on account/opportunities.
Now.. for the result.
Validation rules -
- Allow you to define expressions / formula to enforce validations
- They can include error messages that get displayed to users - either near the field that causes error or at the top
- Get triggered and complain about things wrong with the world even when user does not have access to the fields used within the rule
- Contradicting validation rules may never allow you to save record
# Business Automation
Business automation refers to to automated tasks that the system can execute without human intervention 😃. They may be -
- Updating field values based on rule
- Assigning ownership of records
- Process approval flows
- Escalation rules
You will hear the term "business process" thrown around a lot here and everywhere else. That just refers to the process followed by a business to accomplish an objective. It runs independent of technology systems, but technology systems should be built around/supporting it. A business process can span multiple people, systems and tools in its life cycle.
A business process can be -
- Acquiring new leads
- Opportunity management
- Order management process
- Service management
Salesforce provides abilities to automate many distinct parts of the system. For purposes of visualisation (if nothing else) we categorise the main engines of running automation as follows -
- Workflows
- Process builder processes
- Flows
- Automation using Apex
In addition we also have -
- Approval rules
- Assignment rules
- Escalation rules for entities like Cases
There are other components too - e.g. updating "stuff" on UI based on user actions, automated report generation and delivery, etc. - but we tend to focus on the forest than trees. (we had to use that sentence even though it's not super relevant in this context and we can be stubborn like that). We also do not discuss more on Apex solutions - they are part of the salesforce developer learning series.
Let us go over more details on the automation components in salesforce.
# Workflow
Workflows were the main engine for process automation for a while, before being overtaken by more powerful tools.
Workflows are relevant today for keeping things simple and straight forward. Also, outbound messages are great. But, we secretly believe they will go away in a while and be completely replaced by process flows.
The main parts of the workflow are -
- Workflow rules: Conditions to trigger a workflow
- Workflow actions: Action to take when workflow is executed. There are four types of actions -
- Field updates: update a field based on update to some other field/record
- Outbound messages: send messages to external systems based on updates
- Email alerts: send email alerts
- Tasks: create a task
To create a new workflow -
- Go to Setup > Select Home tab
- Find for Workflow and select Workflow Rules. Fill in information
- Click on New button to create new workflow
- Select object on which workflow should run
- Select evaluation and rule criteria (see below)
- Create new workflow actions or reuse existing workflow actions. You can also find for Workflow and select Workflow Actions to see existing workflow actions (see below)
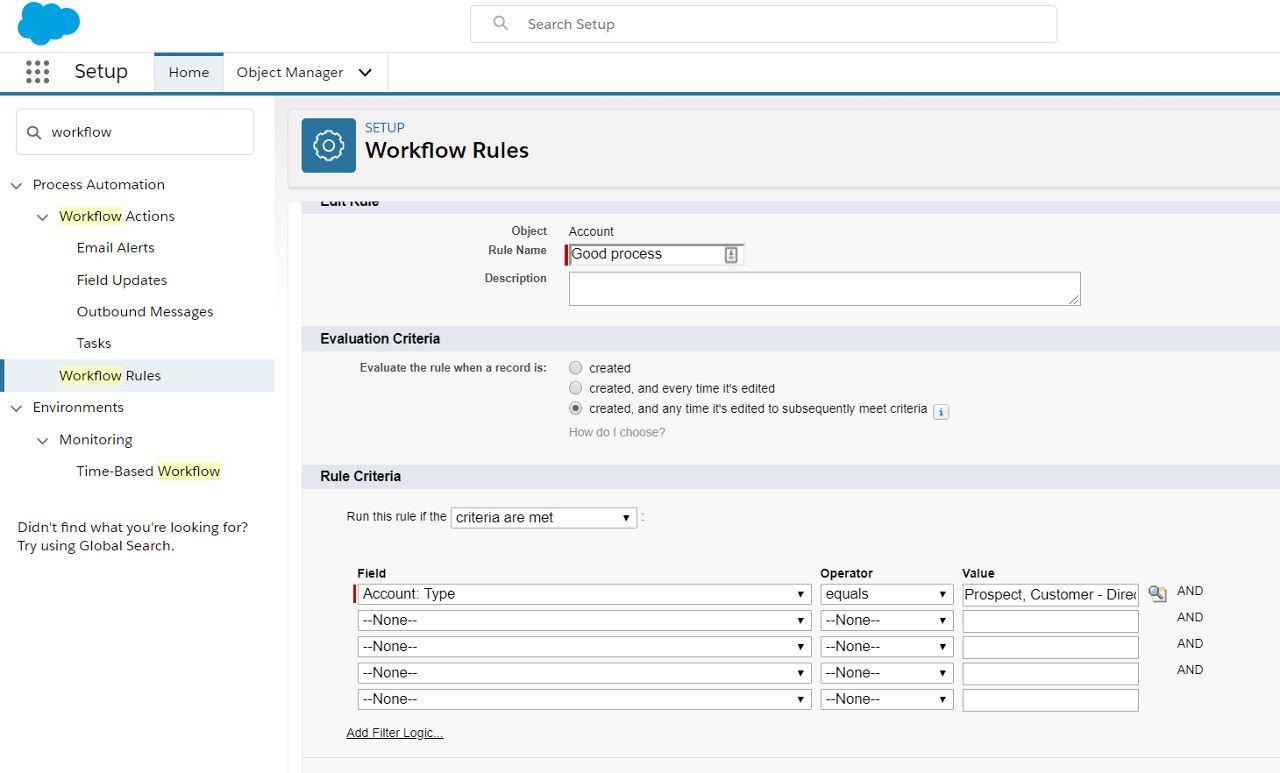
# Evaluation Criteria
Workflows can be triggered when -
- a record is created
- a record is created or edited (i.e., every time it is saved)
- a record is created and anytime it is edited - when it fulfils the workflow criteria after the said edit (but it was not fulfilling the criteria before)
# Rule Criteria
Rule criteria define the conditions to be satisfied for the workflow to execute against a record. A record has to fulfill evaluation criteria and must meet the conditions set in rule criteria.
Rule criteria can be -
- created as a set of fields and field values. For e.g. execute workflow only when 'Account Type' field = 'Retail'
- created as a formula that needs to evaluate to
true. For e.g.Account Type == true && Status != 'Closed'.
# Workflow Actions
Workflow actions specify the action that is taken on the record.
Workflow actions specified against a workflow will belong to the same object + record that the workflow belongs to. In other words: workflows can act only on the same record that triggers the workflow.
Actions can be executed in two ways -
- immediate: at the same instant in time when the workflow is executed
- time-trigger: Execute workflow after/before specified criteria.
- x hours or days after workflow is triggered
- x hours or days before /after a field specified in the time-trigger action
Use cases for time-triggered actions can be -
- Trigger reminder email to customers for timely payment 1 day before due-date
- Update account status to 'Retired - Closed' one month after status is updated to 'Retired'
- Create follow-up task and assign it to quote owner one week after the quote was sent if quote status continues to be 'Quote Sent'
When we are on the subject of actions, we have to speak more on email alerts. Emails that are sent as part of email alerts use "email templates" in salesforce.
Email templates specify a template message and may have one or more placeholders to contain data. For e.g.:
Dear {!Contact.FirstName},

All of us at Awesome Company are glad to have {!Account.Name} as a customer.

I would like to introduce myself as your Account Manager. Should you have any questions, please feel free to call me at {!User.Phone} or email me at {!User.Email}.

You can also contact us on the following numbers:

Sales: 12345 67890
Customer Service & Support: 12345 67890
Fax: 12345 67890

Best Regards,
{!User.Name}
When you use an email template, salesforce replaces the placeholders with data from the record in context and send the email. The email templates have a number of customisation options to use your own branding, letterhead etc.
You can also enable your users to choose email templates (created as Lightning Email Templates) in your standard views. For e.g. go to Contact tab > Drill-down on a contact > Go to Activity tab in the detail page (to the right) > You see an option to send email where you can select a template to use.
Email alerts are used in multiple places in Salesforce. We don't quite talk about them since they are fairly self-explanatory but they are fun to explore - try them out!
# Process Builder
Processes are powerful tools to provide a (good looking) visual way to create process automation flows. They are created using Process Builder.
We have seen workflows already and understand their limitations -
- They can act on the record that fulfills the workflow criteria (or the parent)
- Workflows can do only a set of limited actions
- Anything more complex needed customisation using Apex
Processes created on process builder enable enhanced tools to carry out automation using clicks. For e.g. you can easily configure process flow to -
- Update multiple records (related or otherwise) when a record is updated
- Trigger custom functions written in Apex along with configured functions provided by Salesforce
- Create processes in a modular fashion and call processes from other processes - manage complexity and reuse logic!
- Carry out the same actions that a workflow can do 😃
To create a new process -
- Navigate to Setup > Select Home tab
- Find for Process. Select Process Automation > Process Builder
- Click on New
- Provide name and description
- Provide trigger condition that can specify when this workflow will start - when record is changed, a platform event is received or when invoked by other process
- Visually develop workflow
- specify object trigger
- add one or more sets of criteria and specify immediate & scheduled options
- Activate workflow and see it in action
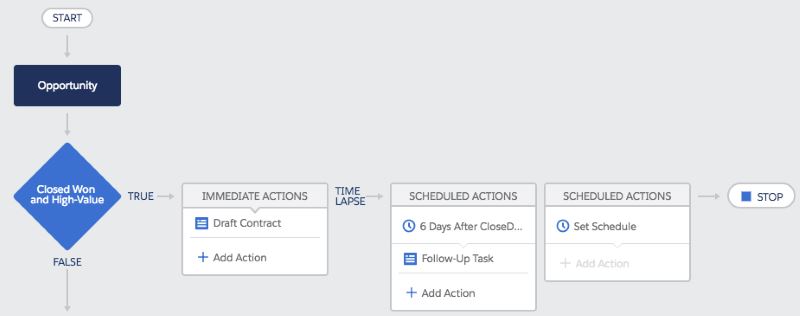
src: salesforce.com
# Flows
Flows, or Lightning flows, do much more than simple decision trees - they can implement a completely interactive workflow that the users can follow through to capture data or make business decisions.
Of course, you could also run a flow in the background and do powerful things beyond what a process builder or workflow can do too.
For e.g. -
- Order capture process: ask a bunch of questions, qualify customers/products for discounts, capture products/special instructions, ensure stock availability in the nearest warehouse, and submit orders
- Service call: collect product and customer details, provide pricing based on customer service plan and warranties, and schedule service based on personnel availability
- Quote pricing: Invoke approval processes, create follow up activities once a quote is tailored for customer
As you an easily imagine, these processes span across different entities and can be quite complex.
The user interactivity is super advantageous in flows that direct information capture and streamline process -
- Just the right data: Inefficient service due to lack of information and/or data not captured at the right time = customer frustration
- Easier onboarding: New employees find it difficult to get up to speed on working efficiently
- Better consistency in processes
- Make sense out of data: Availability of consistent, right data to leverage system better
You use a 'Lightning Flow Builder' to create a new flow -
- Navigate to Setup > Select Home tab
- Find for Flows. Select Process Automation > Flows
- Click on New
- Select Screen Flow (interactive) or Autolaunched Flow
- Provide trigger against start step (if applicable) and start drag-drop'ping away actions for your flow
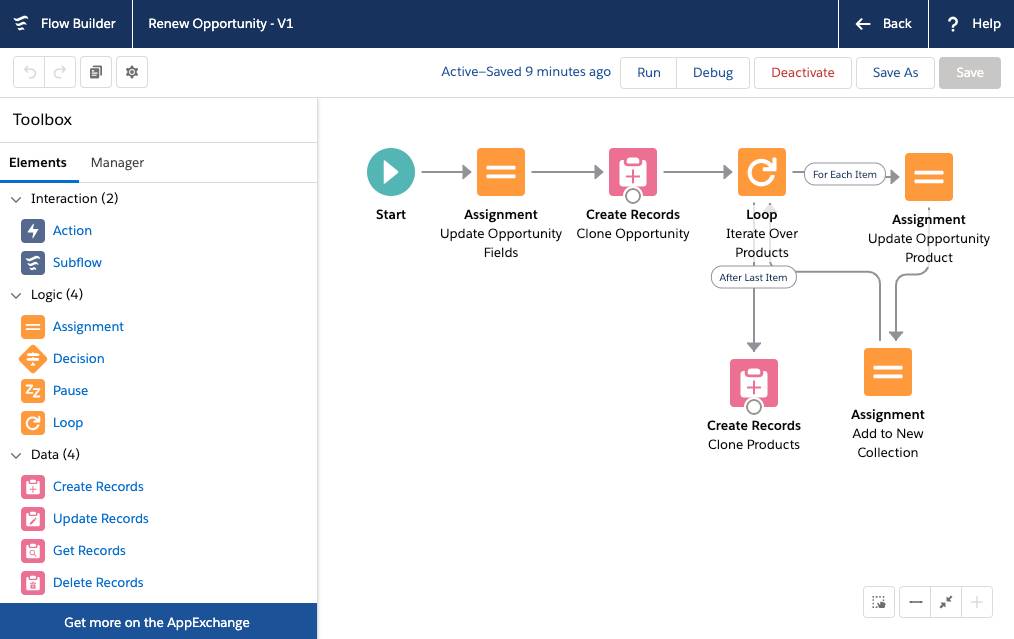
src: salesforce.com
When users launch a flow, they launch an 'interview'. The interview is an instance of flow execution that captures data (if applicable), makes decisions, and invokes actions.
You can include flows that have user interactivity on your Lightning UI using Lightning Page Builder. See a sample 'Quick Account' flow in action below.
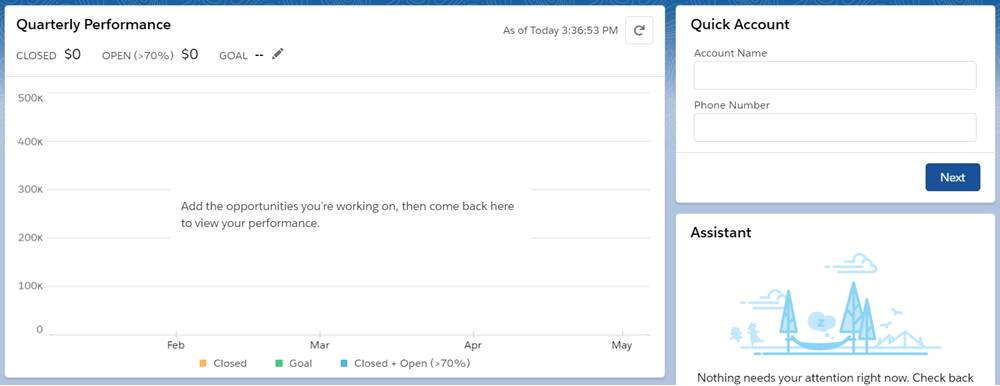
src: salesforce.com
# Flows vs. Workflows vs. Lightning Flows
Here's a summary of what we learnt from the configurable automation and when to use what -
| Description | Workflow | Process Builder | Lightning Flow |
|---|---|---|---|
| What it can do? | Update fields on same record, create tasks, send outbound messages | Update fields on same or different records/entities, create records, invoke Salesforce functions like publishing to Chatter, approval processes, & invoke other processes, flows or complex Apex functions | Create/update/delete records/other entities, support all functions supported by process builder |
| When to use this functionality? | Simple use cases | Simple to complex use cases that do not need any user action during execution | Guided processes |
| Typical development complexity | Low | Simple - Medium | Medium - High |
| Usage complexity | Simple & transparent to user | Simple & transparent to user | Makes complex processes simple for use |
| Suitable for high-traffic processes?* | Yes | Yes | No (constant user interaction and guided processes make it not-so-endearing for highly used processes) |
| Interactivity (e.g. can user click buttons, change behaviour mid-process during execution) | No | No | Yes |
| Immediate / timed actions | Both | Both | Immediate, Batch job |
| Can be triggered by | Record save after create or edit | Record save after create or edit, other processes | User action, create records, update records, processes, other flows |
| Send data to external systems | Yes | Yes | Yes |
| Respond to platform events | No | Yes | Yes |
| Retrieve data from external systems | No | No | Yes |
* Highly opinionated views
# Approvals in Salesforce
Approval flows at the outset do not seem to be all that important.
But, once you get deep into an organisation mind-set, you start seeing it in a constant embattled state-
- ever-increasing need to serve customers right
- a huge pool of sales & service personnel who need their priorities set right
- the need to get timely data to make right decisions
- an ever-present need for compliance - regulatory and organisation-driven
These and many more factors necessitate everyone in the organisation to work as a team, make decisions based on data, involve the set of right people in decision-making process, and do all that in a seamless fashion that does not restrict ability to serve customers better.
Enter approval flows (you are permitted to imagine the sound of drum-rolls at this time). Approval flows may be used to approve -
- Deals beyond a certain value, or deals that need to incorporate special terms of a client
- Qualify an account type or account category
- Pricing discounts
- High-value orders ..etc.
An approval flow contains three major components -
- Triggers - rules that qualify entities/records for approvals, ability to enforce compliance needs
- People: direct approvals to the right set of people, visibility of processes to all stakeholders
- Process - ensure approvals sequentially or in parallel, standard communication protocols, decide the next course of action when approvals are completed or rejected
# Creating Approval Process
Approval processes are easy to get started on.
Go to Setup > Home tab
Find for Approval Processes. Select Process Automation > Approval Processes
Select entity for which approval processes need to be created against Manage Approval Processes For:
Click on Create New Approval Process drop-down and select one of the options
- A jump start is good enough to quickly get started and worry about complexity later
- Wizard takes you through all the required steps in a methodical fashion
You will be applying the same standards no matter which option you go through to create an approval process -
- Specify criteria for triggering approval process
- Select approver - either allow user to choose approver, use user hierarchy to determine next approver, assign to pre-defined queues or groups of users. You can specify a multi-step approval mechanism and also specify whether approvals happen sequentially or in parallel
- Select email templates and layouts to be used to show data to approvers
Once the approval processes are designed and deployed -
- Approval requests are triggered manually by a "submit for approval" action (which is visible button in the detail layout), or automatically based on selected criteria when initiated through workflows
- Emails / Chatter posts are directed at approvers
- Approvers review data and approve / reject requests
- Submitters decide next course of action based on approval outcome
- Approvals are tracked in the Approval history related list
Each of these steps have inbuild data security rules applicable to overall salesforce application. You can make records read-only at the "check of a box" and protect data being approved at all stages.
# Workshop
| No. | Type | Description | Time (hrs) |
|---|---|---|---|
| 1 | Do | Establish entity relationships | 2 |
| 2 | Do | Create validation rules for visits | 1 |
| 3 | Do | Create automation for visits | 3 |
| 4 | Do | Create formula fields / roll-up summary fields | 1 |
| 5 | Do | Create process using process builder | 1 |
# Establish entity relationships
- Establish relationships between different entities as described in the discussed ERD – Hospital, Facility, Doctor, Patient, Care, Customers and Contacts
# Create validation rules for visits
- Visit start date should not be earlier than the previous day
- Visits must have one or more doctors in active status associated
- Allow not more than 3 visits to be scheduled by the same patient
- Allow not more than 10 visits / hour of doctor availability
# Create automation for visits
Choose any technology option for the following automation requirements.
- Visits should be cancelled with reason code as “No Show” if there is no visit on the scheduled time (only for scheduled visits)
- Allow CC to “check-in” scheduled visits
- Send reminder for scheduled visits one day prior to the visit
- Closure of visits should result in a ‘thank you’ email sent to patient
- Summarize visits for each day against doctors and send automated email to doctors
# Create formula fields / roll-up summary fields
- Show the last ‘no show’ date when patient calls up for an appointment
- Create formula field to sum up total fees for today against doctors
- Roll up fees for individual items against the visit
# Create process using process builder
- Create an invoice with sample invoice items when visit status is changed to 'Done'. Send invoice in email to patient.
- Create post visit tasks - only if visit has been successfully concluded -
- Send thank you email (content of your choice - refer registration email template for inspiration) and solicit feedback one week after a visit is concluded
- Create a follow-up task three weeks post visit. Task should be scheduled to be four weeks after visit